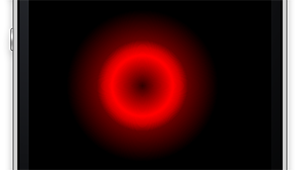
In this two parts iOS tutorial I’ll show you a way to connect Core Graphics, Core Animation and Touch event management. The result of this experiment is a circle filled with a red gradient which appears smoothly when the user touches the screen, following his pan actions.
In this post, we draw the circle using Core Graphics. In the next post, we manage touches using gestures and NSEvent and then we animate the layer opacity using Core Animation.
You will find the complete project at the end of the post.
Drawing the circle
In my opinion, drawing shapes just by using code is a really fulfilling experience (when your code works immediately, that is). So let’s create our shape just using Core Graphics in a quick and easy way.
The next image is a preview of what we are going to draw.

We keep the code clean thanks to a dedicated class which describes the shape. So create a new UIView subclass and call it CircleGradient, then add the QuartzCore framework and import it in the header (we’ll need it next to use Core Animation).
#import <QuartzCore/QuartzCore.h>
Now define the function generateRadial which returns a UIImage containing a red radial gradient (remember that you can find the full code at the end of the post)
-(UIImage*)generateRadial{

    //Define the gradient ----------------------
    CGGradientRef gradient;
    CGColorSpaceRef colorSpace;
    size_t locations_num = 5;

    CGFloat locations[5] = {0.0,0.4,0.5,0.6,1.0};

    CGFloat components[20] = {  1.0, 0.0, 0.0, 0.2,
                                1.0, 0.0, 0.0, 1,
                                1.0, 0.0, 0.0, 0.8,
                                1.0, 0.0, 0.0, 0.4,
                                1.0, 0.0, 0.0, 0.0
                            };

    colorSpace = CGColorSpaceCreateDeviceRGB();

    gradient = CGGradientCreateWithColorComponents (colorSpace, components,
                                                      locations, locations_num);


    //Define Gradient Positions ---------------

    //We want these exactly at the center of the view
    CGPoint startPoint, endPoint;

    //Start point
    startPoint.x = self.frame.size.width/2;
    startPoint.y = self.frame.size.height/2;

    //End point
    endPoint.x = self.frame.size.width/2;
    endPoint.y = self.frame.size.height/2;

    //Generate the Image -----------------------
    //Begin an image context
    UIGraphicsBeginImageContext(self.frame.size);
    CGContextRef imageContext = UIGraphicsGetCurrentContext();
    //Use CG to draw the radial gradient into the image context
    CGContextDrawRadialGradient(imageContext, gradient, startPoint, 0, endPoint, self.frame.size.width/2, 0);
    //Get the image from the context
    UIImage *result = UIGraphicsGetImageFromCurrentImageContext();
    UIGraphicsEndImageContext();

    return result;
}
To draw the gradient we use a CGGradient object.
This struct essentially needs a list of steps defined by the pair Color/Location. The simplest gradient could be described by two steps, but our example uses five just to make the gradient more interesting. Like a boss, right?
This part of code defines the gradient steps:
    CGFloat locations[5] = {0.0,0.4,0.5,0.6,1.0}; //Locations

    CGFloat components[20] = {  1.0, 0.0, 0.0, 0.2, //First Color  ----> location  0.0
                                1.0, 0.0, 0.0, 1,   //Second Color ----> location 0.4
                                1.0, 0.0, 0.0, 0.8, //Third Color  ----> location 0.5
                                1.0, 0.0, 0.0, 0.4, //Fourth Color ----> location 0.6
                                1.0, 0.0, 0.0, 0.0  //Last Color   ----> location 1.0
                            };
The first color component (defined in RGBA) is associated to the first element of the array locations, the second color to the second location and so on…
The drawing method used by Core Graphics for radial gradients relies on interpolation between gradient steps. This method differs from Photoshop’s (and many other “drawing tools”) in the way it draws the steps. In Photoshop each step’s center has the same position (remember, Radial Gradients), while in Core Graphics the initial and final steps’ centers can be defined in different positions (check the documentation for more information about that).
We want to represent a circle, so we draw initial and final steps at the same position. In this case, it’s the center point of the view.
    //Start point
    startPoint.x = self.frame.size.width/2;
    startPoint.y = self.frame.size.height/2;

    //End point
    endPoint.x = self.frame.size.width/2;
    endPoint.y = self.frame.size.height/2;
We want this function to return a UIImage*. So we create an image context and we draw in it using the Core Graphics function CGContextDrawRadialGradient.
    UIGraphicsBeginImageContext(self.frame.size);
    CGContextRef imageContext = UIGraphicsGetCurrentContext();
    //Use CG to draw the radial gradient into the image context
    CGContextDrawRadialGradient(imageContext, gradient, startPoint, 0, endPoint, self.frame.size.width/2, 0);
This function receives the gradient that we have previously created using the color and location components, the initial step position, the initial radius (this case 0), the final step position and the final radius (half of the view width).
Last, we create the image using the function UIGraphicsGetImageFromCurrentImageContext, which has a self explanatory name, and we close the image graphic context.
    UIImage *result = UIGraphicsGetImageFromCurrentImageContext();
    UIGraphicsEndImageContext();
We have programmatically created a UIImage that can be used in our code as any other image. Let’s add it as content of the view layer in the initWithFrame function.
- (id)initWithFrame:(CGRect)frame
{
    self = [super initWithFrame:frame];

    if (self) {
        self.layer.contents = (__bridge id)([[self generateRadial]CGImage]);
    }

    return self;
}
The Layer property contents expects a CGImageRef as value casted to id.
This class is now ready to draw the red circle. We could test the work done so far just by attaching an instance of CircleGradient as subview of the main view controller. Let’s add a property of type GradientCircle* in ViewController.h and in ViewController.m set this property with a new instance of GradientCircle.
[code lang=”obj-c” title=”ViewController.h”]
@property GradientCircle* gradientView;
[code lang=”obj-c” title=”ViewController.m”]
– (void)viewDidLoad
{
[super viewDidLoad];
//Generate the gradient view ——————–
self.gradientView = [[GradientCircle alloc]initWithFrame:CGRectMake(50, 50, 200, 200)];
[self.view addSubview:self.gradientView];
We can now compile and see the result. 🙂
That’s all for this post. In the next one I’ll show you how to add touch management and animations to this simple application.
Yari D'areglia
https://www.thinkandbuild.itCEO at Nexent.io by day, indie game developer by night. I also run the blog indiegames.wtf.