The past few months have been intense. Among the many things that happened and kept me away from writing, I got married and released the first game I ever worked on, Linia. Even though I’m super happy about both, I’ll talk about Linia here and about how, by harnessing the power of Unity, we were able to build custom tools to speed up level creation and get to a working game core in just a few weeks.
A few words about Linia
Linia is a 2D puzzle game for iOS and Android with a simple and original gameplay: you need to find a specific sequence of colors by tracing a line over shapes that rotate, scale and move around the screen. According to the reviews it’s fun and challenging — just what we aimed for. Check the video below for a quick preview.
Marco and I worked on the game in our spare time, mostly during the weekends. We only met in person in a couple of occasions to define the main milestones and to sort out the trickiest bits of the develompent. We needed to be extremely focused due to our time constraints and – also thanks to the power of Unity – we ended up with a stable engine for the game in just over 1 month. I have to admit, we didn’t expect such a solid result so quickly.
The game was very well received: we were featured on most Apple’s App Stores with a really nice Editor’s Note
“Minimalist puzzlers are all the rage and that means you’ve gotta step up if you want to stand out. Thankfully Linia comes packed with more than a few exceptional tricks. As you watch orbs pulse, spin, and twirl in mesmerizing patterns, it’s difficult to find the right color sequence. Then you have to slice through it in one clean motion which means you have to be exact. It’s not easy, but it sure is cool.”
and many websites reviewed the game. Macstories, AppAdvice, stuffTV, GamingCypher are just a few of them.
We ended up being extremely satisfied with the final result, so we decided the team deserved a name… And that’s how Black Robot Games was born. Let’s dive into the technical stuff now.
Main structure, Scenes Directors and Managers
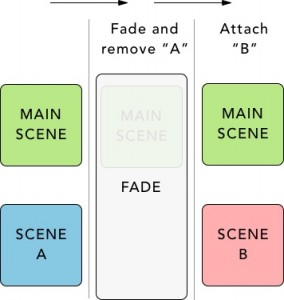
The main structure of the game was one of the most important part of our work. We wanted to achieve a really simple yet strong logic that would allow us to present and handle the scenes. The first choice we had to make was between using a scene for each level or building a monolithic scene where all the levels are presented. We picked the former, because we realized that the new Scene Manager that comes with Unity is simply amazing! You can in fact add more than one scene in the hierarchy and define if you want a new scene to completely substitute the current or just add a new one to the scenes hierarchy. That was exactly what we were looking for. We created a Main Scene where we placed all the shared elements (like the main camera) and depending on the user’s actions we attached other scenes to the hierarchy. As you can see, each “view” of the game is a different scene and it is presented or removed from the screen as needed.
Handling Scenes
As you’ll also read later, we used a very strict approach when deciding each component’s role. We wrote a Scene Director on top of the Unity Scene Manager and we assigned it so that it was the only object able to add a scene to the hierarchy. With this rule in place, it has been extremely easy to follow the game flow and debug the user navigation. In spite of personal preferences, we used a singleton structure for our managers allowing us to move from one scene to the other with only one line of code, called anywhere in the game:
[code]
SceneDirector.Instance.GoToIntro();
Internally, the Scene Director presents an overlay that fades the screen to black, attaches the new scene and fades it in when the new scene is ready. The action of loading and unloading the scenes is still in charge of the default SceneManager:
  private void showScene(string sceneName){
    if (currentScene != sceneName){
      if (currentScene != null){
        SceneManager.UnloadScene(currentScene);
      }
      currentScene = sceneName;
      SceneManager.LoadScene(sceneName, LoadSceneMode.Additive);
    }
  }
A trick we used to let the Scene Director know when a new scene was ready was to manually trigger a method on the Scene Director from the Start or Awake functions of the loaded scene.
Note: in all honesty, we’re not really happy with how we’re managing this, so if you have any better solution to share the ready-state for a scene, just let us know 😛
void Start(){
    SceneDirector.Instance.SceneReady(“intro”)
    …
Distributing Responsibilities with Managers
If you have been writing code for a while you know how easy (and dangerous) it is to spaghetti-fy your code, especially when working with a new tool. A strict definition of how to distribute responsibilities helped us avoiding that. Together with the Scene director we already mentioned, here are some of the other actors of the game core:
LevelsManager: This is what you’d otherwise call “Game Manager”, but we wanted to give it a really specific name, considering it’s only responsible for the initialization and tracking of the levels. From this controller we get to know a number of things: playable levels, locked ones, the “next” level in the game progression, and information about user advancements. Also, it restores user status from iCloud or GooglePlay.
EventsManager: This manager triggers some important events inside the game. A simple pub-sub logic based on c# delegates: you can subscribe to an event to launch actions when the event is triggered.
Here is a quick example:
  void Start () {
    EventsManager.Instance.OnGameCenterLoggedIn += HandleGameCenterLogin;
AudioManager: We adopted the same strict approach when deciding how to play sounds, so the only object responsible for sounds is the AudioManager. It keeps track of sound sources, it communicates with the user’s preferences to mute/unmute game effects and it plays sounds from the sources. Here’s how we play sound effects:
AudioManager.Instance.playFX(clip);
PrefsManager: This one keeps track of the user’s preferences and local data and it communicates with other actors to trigger any change/update.
Now, we have written some other actors – each one with a well defined role, but the key takeaway here is that by setting things up properly, we ended up knowing exactly which manager to use for each new action we created over the course of the entire production.
Levels, levels and levels: Write your custom tools or (slowly) fail
Being a pay-to-play game, Linia needed a big number of levels to be considered by the casual mobile gaming public. That’s why we decided our starting point would be 80 levels. Level design and building take time and having to start over 80 times would have been a massive time-sink. We wanted to set the environment so that we would reduce repetitive tasks to a minimum.
Luckily, Unity’s editor is extremely editable (pun intended) and you can easily build a set of tools to fit your needs.
Each level in Linia is filled with animated shapes – that’s why we started creating the animations using the integrated Unity animator. Sadly, we immediately realized that this tool cannot be easily reused without copying thousands of animator controllers and animations around. Plus, we needed a finer control over the movements of our shapes.
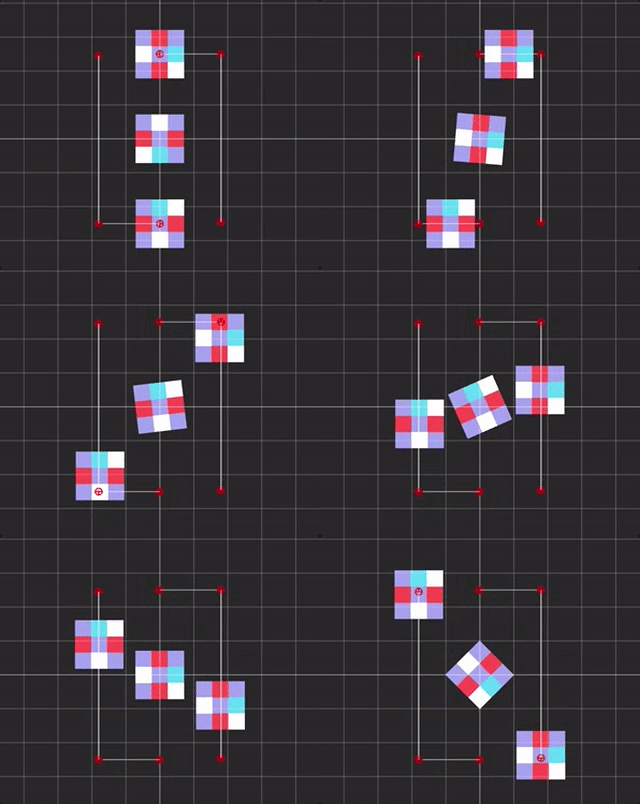
Take a look at this level from the scene editor:
To achieve the animations of the top and bottom squares we have created a waypoint transition animation. You can easily spot the 3 red dots attached to the squares. Those items are not part of the default Unity editor.
To build this tool, we drew directly inside Unity’s editor (because you can, it’s very cool) with functions like OnDrawGizmos. Each square has 3 special game objects attached as children. The script that we have created (called KeypointsTween) just reads the position of its waypoint-children, draws the dots and lines and animates the shape through those waypoints.
Here is the code:
  void OnDrawGizmos(){
    if (editMode) {
      drawEditor();
    }
  }

  private void drawEditor(){
    if(!Application.isPlaying){
      keypoints = GetKeypoints();
    }

    Vector3 previousPoint = new Vector3();

    if (keypoints.Length > 0){
      for (int i = 0; i < keypoints.Length; i++){
        Gizmos.color = gizmoColor;
        Gizmos.DrawWireSphere(keypoints[i],0.1f);

        if (i > 0){
          Gizmos.color = new Color(1.0f,1.0f,1.0f,0.5f);
          Gizmos.DrawLine(previousPoint, keypoints[i]);
        }

        previousPoint = keypoints[i];
      }
    }
  }
The OnDrawGizmos function is called every time the systems needs to draw the gizmos, so we can use this function to draw our custom editor elements. The drawEditor function gets the list of keypoints attached to the shape, then draws a red sphere at each point position and a line that connects a point with the previous point using the DrawWireSphere and DrawLine functions. We disable the gizmos by setting the editMode variable to false. This helped us prevent having to deal with an overcrowded editor.
The keypoints are also used to create transitions in the Update function, using Vector3.Lerp with custom curves to obtain smooth animations.
void Update () {

    if(!paused){
      if(delay <= 0){
        float distance = Vector3.Distance (keypoints[currentPoint], transform.position);
        if(mode == "inout"){
          transform.position = Vector3.Lerp(transform.position, keypoints[currentPoint], Time.deltaTime * speed );
        }else if(mode == "out"){
          transform.position = Vector3.Lerp(transform.position, keypoints[currentPoint],EasingFunctions.easeOut(Time.deltaTime , 1 ) * speed );
        }else if(mode == "in"){
          transform.position = Vector3.Lerp(transform.position, keypoints[currentPoint],EasingFunctions.easeIn(Time.deltaTime , 1 ) * speed );
        }else{
          transform.position = Vector3.MoveTowards(transform.position, keypoints[currentPoint], Time.deltaTime * speed );
        }
This is how the inspector looks like for the KeypointsTween script:
We separated the editor settings from the play settings. Within the editor settings you can define the color of the gizmo (again, useful in crowded levels) and disable the gizmo for the current object only. In the play settings there are some interesting options for the animations, like a delay time before the animation begins and a loop setting. We can also define the transition curve mode (a tooltip shows the possible values: linear, inout, in and out).
To setup the inspector this way, we used some special keywords (Header and Tooltip) in the class variable definition to:
public class KeypointsTween : MonoBehaviour {

  private int currentPoint = 0;
  private Vector3[]keypoints;
  private bool isReversed = false;

  [Header("EDITOR SETTINGS")]
  public Color gizmoColor = Color.red;
  public bool editMode = true;

  [Header("PLAY SETTINGS")]
  public bool paused = false;
  public float delay = 0.0f;
  public float speed = 1.0f;
  public bool repeat = false;
  public float minDistance = 0.1f;
  [Tooltip("linear, inout, in or out")]
  public string mode = "linear";
All the animations that we have created have their own custom elements for the Unity editor. We ended up with a complete set of scripts to achieve rotation, scaling, translation, color switching and many other effects that have enormously simplified the levels design work.
Conclusions
As you may have already guessed, we think Unity is a fantastic piece of software. Truth be told, we’ve only scraped the surface of its potential and we are still studying it while working on other very interesting projects with Black Robot Games. We couldn’t be more excited about what’s coming next!
What do you think about it? Have you tried Linia? Let’s chat on Twitter, let me know! 🙂
Yari D'areglia
https://www.thinkandbuild.itCEO at Nexent.io by day, indie game developer by night. I also run the blog indiegames.wtf.


