Creating VideoGames has always been one of my biggest dreams. I was born in 1981 and I’ve had the privilege to play classic 2D games on pieces of computer history such as the Commodore 64 and the Amiga (500, 500+, 600, 1200 and the terrible CD version). Guys, back then I used to have black curly hair… I used to have hair! Well… let’s talk about Cocos2D.
Thanks to the rise of smartphones and social networks, 2D games have a second life and Cocos2D in my opinion is our best way to be part of this new 2D era.
In this article I want to give you a simple overview of Cocos2d that should help you move seamlessly through the best resources I’ve found in these last few months about the subject.
In my opinion it is completely useless to write another tutorial that shows you how to create yet another simple game, there are a whole lot of cool resources out there for that. I’d rather show you some theory and share with you the resources on Cocos2D I consider to be the best.
Cocos2d? Uhm… tell me more
Cocos2D is a 2D Game Engine that takes care of some really important tasks for you, like: rendering, audio and input management, menu and scene generation/management, physics simulation and more.
As you can imagine there is a lot of work to put all these stuff together from scratch. Cocos2D does the job really well!
There are currently different versions of Cocos2d:

cocos2d-x: This is the cross platform version. It can compile for Android, Blackberry, iOS, OS X, Linux, Windows and Windows Phone. With this version you’ll mainly write code in C/C++.

Cocos2d-iphone v1.x: It only works with iOS and you can write code in Objective-C and Objective-C++. This version use OpenGLES 1 so you can create apps that are suitable for old devices.

Cocos2d-iphone v2.x: This is (at the time I’m writing this article) the latest version and it’s built on top of OpenGLES 2. Again, you write in Objective-C and Objective-C++ and you can only build for iOS.
Cocos2D elements
Cocos2D helps you structure your game in a nice way.
It could take a while to grasp it and to understand how to use each component in the right way, but once you get it I’m sure you’ll really appreciate every part of the engine.
In the next sections I want to introduce the main elements of Cocos2d without using a row a code, I’ll just speak about how they work together to bring the magic your game.
Scene Graph
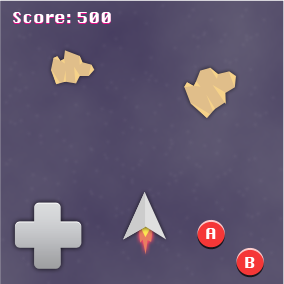
Even a simple game could be composed by many different parts. In the main game view, for example, we could have a GUI to draw the score, the commands with a virtual joypad and the game graphics itself.
To combine every part of the game, Cocos2d uses a technique called Scene Graph that keeps track of each component through a simple hierarchy.
Scene and Layers
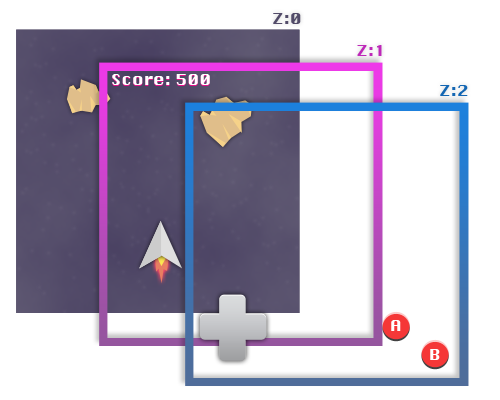
With this method you can group objects using layers and define the order in which these layers must be drawn. The highest layer is on top, while the innermost is overlapped by the other layers.
These layers are going to compose a scene.
Let’s compose the simple scene we have previously described,
it is named Game Scene and it is composed by 3 layers:
- GUI: The Score label
- Command: The Joypad
- Game: The game graphics etc
We want the GUI and the Command to be displayed over the Game Layer, so we can build our scene with this hierarchy:
Game Scene
|——– Game at z:0
|——– GUI at z:1
|——– Command at z:2
To describe the scene we can say that the Game layer is at Z level 0, the Score layer at 1 and the Command layer at 2 and all the layers are children of the scene. So a lower Z value means a deeper level in the scene graph and a layer with an higher Z value is closer to the user’s point of view.
In Cocos2d a basic scene is described with the class CCScene and the layer by CCLayer.
Sprites
Now let’s focus on the Game layer.
As you can see it contains different objects: a spaceship and some asteroids.
These objects are drawn through sprites: they are elements mainly based on images and in this case they are children of the Game Layer.
The same applies to the other two layers: the GUI uses a sprite for the label and the command layer uses some other sprites to draw the joypad and the buttons.
So our Scene Graph is deeper than what I’ve previously shown you:
Game Scene
|——– Game at z:0
|——— Asteroids
|——— Spaceship
|——– GUI at z:1
|——— Labels
|——– Command at z:2
|——— Joystick
|——— Button A
|——— Button B
In Cocos2D a sprite is an instance of CCSprite. Keep in mind I’m only trying to tell you about the main classes, while many other subclasses exist (just a simple example: a label can be better described by the class CCLabelTTF, subclass of CCSprite).
All the elements I showed you so far inherit by a class called CCNode. This class has the basic information needed to describe an object of the Scene Graph.
Director
As you can imagine a game is composed by more than one scene.
Usually a game begins with one or more screens with the logos of the software houses involved in the game, then the player can choose what to do next thanks to a Menu that presents some choices like “Single Player”, “Settings”, “Scores”. Each of these steps can be defined by a different Scene.
To control how these scenes are presented, Cocos2D relies on a special object called Director. The director, as the name says, is the responsible of the scene sequence.
Through this element we can detect which is the current scene and move to the next one.
The Director is also useful to manage other information, like screen data and frame rate.
Let’s do it!
Believe it or not… these are all the components you need to create your first (no audio, no physics, single player) simple game.
Where to go next?
Right now you have an overview of the main components needed to start with Cocos2d. Obviously there are many other important aspects to grasp.
Download Cocos2d
First you have to download and install Cocos2d :). This is extremely simple, just follow the instructions you find in the Readme.txt to install some really useful templates for Xcode and you are all set.
You can choose between the version 1 and 2 (they are slightly different though and some code for a version doesn’t work well with the other version). You can also get the development version that is the most updated but it is not considered as Stable. You’re free to take your risks 🙂
Ray Wenderlich

The next tutorial that I’d read after this introduction is “How to make a simple iPhone game with Cocos2D” by Ray Wenderlich. It is a three part tutorial but in my opinion the first part is what you need to really understand how to write code for Cocos2d.
Ray’s website is the best resource that you’ll find online for Cocos2D. It has a huge list of tutorials from beginner to advanced.
Steffen Itterheim

Steffen is the author of the best book I’ve read about Cocos2d.
This book at the moment is the only one that’s completely updated at the version 2.X.
Plus, he is the developer of a really interesting framework called Kobold2d. I consider this framework an evolution of Cocos2d, but to be honest I haven’t tried it yet. Reading his book I’ve read many information about Kobold and I’m sure it’s worth a try.
Last but not least, Steffen writes really interesting tutorials that you can find at his blog.
Maniacdev
You probably already know Maniacdev, it is a great resource. Here you can find a list of Cocos2D example and searching for Cocos2d you get many other selected articles.
iForce2d
It’s too early to speak about Physics and I haven’t introduced the subject so please consider this paragraph kind of Off-Topic, but Cocos2D comes with 2 Physics engines: Box2D and Chipmunk.
Personally, I prefer Box2D, so yes my next suggestions are lean towards that.
When it comes time for you to learn how to use Box2D please take a look a this website. Here you’ll find the best tutorials about it.
The author is also the developer of R.U.B.E. a box2D editor that helps you write complex scenes.
Documentation
The last link is the official documentation (nothing more than a technical reference).
I know that there are many other resources, I’ve spent a lot of time googling, reading books and tutorials and I’m confident in saying that you don’t need more then what I listed here to begin with Cocos2d in easiest and most reliable way.
Happy learning!
Yari D'areglia
https://www.thinkandbuild.itCEO at Nexent.io by day, indie game developer by night. I also run the blog indiegames.wtf.

