The last months were quite intense. Nicola and I, have released an iOS App for a client that right now is heavily featured in the Italian App Store, I’m planning a trip to Japan (actually, my girlfriend is…) and I’ve started a new personal iOS project.
Nonetheless, I’m ready to continue on our journey with Auto Layout!
In the previous article I introduced the topic with some easy examples (please, if you are new to Auto Layout, read that before proceeding).
Intro
In this new post I want to show you how to use Auto Layout programmatically. It means that we are not going to use xib or storyboards… just code.
Before opening xCode let’s quickly introduce the Visual Format Language (VFL) and the functions needed to manage the layout.
With VFL you can define constraints using a simple syntax. For example you can define the width of an element using this string:
"H:[element(100)]"
or the height using:
"V:[element(100)]"
The first uppercase char tells which dimension you want to modify. H stands for horizontal and V for Vertical. Then you define the constraints (more about that in the next examples).
Constraints are defined by the NSLayoutConstraint class. You can attach new constraints to a view with UIView’s method addConstraint(s): and remove them with removeConstraint(s):
Let’s code
Download the project and open the file viewController.m.
This file contains all the code for this tutorial and it is organised in single autonomous functions (with a lot of repeated code! F@*& you DRY -.-). Each function represents an example.
You can activate the examples from the viewDidLoad function.
The main view contains 2 subviews: redView and yellowView. In the next examples you are going to place these views into the bounds of the main view using Auto Layout only.
The methods setupViews is the place where the views are initialised and configured:
- (void)setupViews
{
    self.redView = [UIView new];
    self.redView.translatesAutoresizingMaskIntoConstraints = NO;
    self.redView.backgroundColor = [UIColor colorWithRed:0.95 green:0.47 blue:0.48 alpha:1.0];

    self.yellowView = [UIView new];
    self.yellowView.translatesAutoresizingMaskIntoConstraints = NO;
    self.yellowView.backgroundColor = [UIColor colorWithRed:1.00 green:0.83 blue:0.58 alpha:1.0];

    [self.view addSubview:self.redView];
    [self.view addSubview:self.yellowView];

}
Really important: when you have to deal with Auto Layout programmatically you should turn off translatesAutoresizingMaskIntoConstraints. This ensures no constraint will be created automatically for the view, otherwise, any constraint you set is likely to conflict with autoresizing constraints (when you add constraints from IB it automatically sets that property to NO).
EX1: Simple constraints with VFL
Great! you are ready to get your hands dirty.
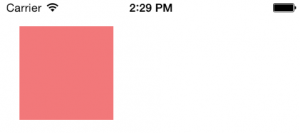
Go to function example_1. This code just adds a square in the top left corner of the main view, like in the next image.
1. First, create a dictionary that associates keys to any view that you are going to use in VFL definitions.
NSDictionary *viewsDictionary = @{@"redView":self.redView};
In this case we’ve marked a reference to the redView view using the key “redView”.
2. Time to create the first constraints with the method constraintsWithVisualFormat:options:metrics:views: of NSLayoutConstraint class.
This method returns an NSArray of constraints. Depending on the VFL you pass to the function it creates one ore more constraints.
In this example we shape width and height constraints for redView using this code:
NSArray *constraint_H = [NSLayoutConstraint constraintsWithVisualFormat:@"V:[redView(100)]"
                                                                options:0
                                                                metrics:nil
                                                                  views:viewsDictionary];

NSArray *constraint_V = [NSLayoutConstraint constraintsWithVisualFormat:@"H:[redView(100)]"
                                                                 options:0
                                                                 metrics:nil
                                                                   views:viewsDictionary];
Let’s start by analysing the visual format strings.
As previously shown, VFL uses H or V to define the orientation of the constraints. Then the square brackets enclose a reference to a view and the parentheses contains the value for the attributes we are setting (depending on V or H we set width or height).
We use “redView” to point out the redView view because we have previously defined a key for it in viewsDictionary and we pass it to the views: argument of the functions.
Now that we have defined constraints for the size we attach it to the redView:
[self.redView addConstraints:constraint_H];
[self.redView addConstraints:constraint_V];
3. To correctly define the constraints for a view you need to give to Auto Layout enough information to obtain size and position. We have already given information for the size of redView, now let’s place it in the main view bounds. Again, we use the previous function just changing the visual format string.
NSArray *constraint_POS_V = [NSLayoutConstraint constraintsWithVisualFormat:@"V:|-30-[redView]"
                                                                    options:0
                                                                    metrics:nil
                                                                    views:viewsDictionary];

NSArray *constraint_POS_H = [NSLayoutConstraint constraintsWithVisualFormat:@"H:|-20-[redView]"
                                                                    options:0
                                                                    metrics:nil
                                                                      views:viewsDictionary];
Let’s translate the first Visual format string in a simple English sentence. @”H:|-30-[redView]” stands for “RedView must maintain a distance of 30 points from the left side of its superview”
While writing the string this way @”H:[redView]-30-|” we say the distance has to be calculated from the right side of the superview.
The pipe char “|” can be read as a reference to the “superview” of the object between square brackets.
The same is true for the Vertical orientation, this time a pipe on the left means “top” while on the right means “bottom” side, so we write:
NSArray *constraint_POS_V = [NSLayoutConstraint constraintsWithVisualFormat:@"V:|-30-[redView]"
                                                                    options:0
                                                                    metrics:nil
                                                                      views:viewsDictionary];
and this code is defining that the redView must keep a distance of 30 points from the top side of its superview.
You could also let the system use default spacing creating a VFL string like this:
@"V:|-[redView]"
No numeric info are given in this string. iOS will use a default distance. Just remember that the syntax needs the “-” to separate the pipe and the element.
Now we need to attach these last constraints to a view to let them take effect.
The view to receive this constraints is the main view. Attention though, we are not attaching the constraints to the redView. To easily remember how to attach constraints, just remember that it is responsibility of the parent view to assign position to its children. So in this case, the main view receives the constraints to arrange redView within its bounds.
[self.view addConstraints:constraint_POS_V];
[self.view addConstraints:constraint_POS_H];
If you are used to place views using the frame property it could take a while get used to it.
At this point, compile and run to you obtain the previously shown result.
EX2: Simple constraints with VFL and multiple views
From viewDidLoad comment example_1 and remove the comments from example_2 function.
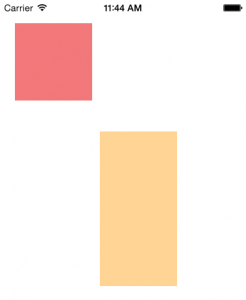
In this example we are dealing with two views and we create constraints which work for both. Here is the final result:
Step 1 and 2 are identical to the previous example. Here we set the viewsDictionary and define size constraints. This time we need to add information for the yellowView too:
NSArray *yellow_constraint_H = [NSLayoutConstraint constraintsWithVisualFormat:@"V:[yellowView(200)]"
                                                                options:0
                                                                metrics:nil
                                                                  views:viewsDictionary];

NSArray *yellow_constraint_V = [NSLayoutConstraint constraintsWithVisualFormat:@"H:[yellowView(100)]"
                                                                       options:0
                                                                       metrics:nil
                                                                         views:viewsDictionary];
    [self.yellowView addConstraints:yellow_constraint_H];
    [self.yellowView addConstraints:yellow_constraint_V];
3. As I told you, a parent view has to take care of its children’s positions. So we create constraints for the main view to define where red and yellow view have to be drawn.
Let’s start by writing the Horizontal information:
NSArray *constraint_POS_H = [NSLayoutConstraint constraintsWithVisualFormat:@"H:|-20-[redView]-10-[yellowView]"
                                                                    options:0
                                                                    metrics:nil
                                                                      views:viewsDictionary];
We are using the same function, so just focus on the VFL string @”H:|-20-[redView]-10-[yellowView]”. Translating it to plain english we’ll end up with more than one constraint:
– redView has a distance of 20 points from the left side of its superview
– the left side of yellowView is 10 points distant from the right side of redView
Does it make sense? I order to help you read these strings you should keep in mind that they are based on really simple sequences where the main actors are the “|” and the views between “[]”. All the information that separates the actors create constraints.
And to build vertical information we write:
@"V:|-30-[redView]-40-[yellowView]"
This string says
– redView has a distance of 30 points from the top side of its super view
– the top side of yellowView is 40 points distant from the bottom view of redView.
Again, we attach the constraints to the main view.
[self.view addConstraints:constraint_POS_V];
[self.view addConstraints:constraint_POS_H];
EX3: Simple constraints with VFL using alignment options
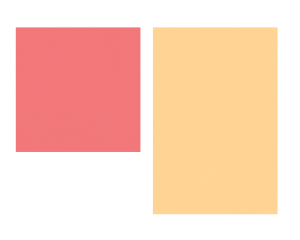
The previous example places the views in a messy way. Let’s rearrange them in a cleaner layout. For example we could align the views to their top sides obtaining this result:
Achieving that is surprisingly easy! We just call the functions constraintsWithVisualFormat:options:metrics:views specifying a value for the options parameter. In fact this parameter stands for alignment-options (at least at the moment).
NSArray *constraint_POS = [NSLayoutConstraint constraintsWithVisualFormat:@"H:|-20-[redView]-10-[yellowView]"
                                                                  options:NSLayoutFormatAlignAllTop
                                                                  metrics:nil
                                                                    views:viewsDictionary];
Let’s check the VFL string: @”H:|-20-[redView]-10-[yellowView]”. It just shapes the horizontal behaviour as it did in the previous example, so nothing new here. The Options parameter though gets the value NSLayoutFormatAlignAllTop.
Within this function call we are defining constraints for both dimensions though, and moreover we are doing it thanks to a relation between the views cited into the VFL string.
CMD+Click NSLayoutFormaAlignAllTop and you’ll se all the available options. We could obviously create a VFL string for vertical orientation which together with an horizontal alignment option (like NSLayoutFormatAlignAllLeft) gives enough information for vertical and horizontal positioning.
EX4: Simple constraints with VFL and metrics
Ok we are almost done with the function constraintsWithVisualFormat:options:metrics:views. We’re left with defining what the metrics parameter is.
In step 1 of the fourth example you’ll see another NSDictionary defined.
    NSDictionary *metrics = @{@"redWidth": @100,
                              @"redHeight": @100,
                              @"yellowWidth": @100,
                              @"yellowHeight": @150,
                              @"topMargin": @120,
                              @"leftMargin": @20,
                              @"viewSpacing":@10
                              };
It works exactly as viewsDictionary. IT defines a key for any value that we want to use in the VFL string. Without further ado I can write some of the VFL strings that are going to use these keys. You can easily get that metrics help you writing more readable VFL strings.
@"V:[redView(redHeight)]"
@"H:[redView(redWidth)]"
@"V:|-topMargin-[redView]"
@"H:|-leftMargin-[redView]-viewSpacing-[yellowView]"
EX5: Dynamic syze
A great advantage of Auto Layout is obviously the ability to create dynamic interfaces.
If you remember from the previous article, we have created views that were be able to adapt to screen size. You can create the same behaviour using VFL.
Go to function example_5 and in step 2 you can see all the needed VFL to define a view that change size depending on its superview.
NSArray *constraint_POS_V = [NSLayoutConstraint constraintsWithVisualFormat:@"V:|-vSpacing-[redView]-vSpacing-|"
                                                                    options:0
                                                                    metrics:metrics
                                                                      views:viewsDictionary];

NSArray *constraint_POS_H = [NSLayoutConstraint constraintsWithVisualFormat:@"H:|-hSpacing-[redView]-hSpacing-|"
                                                                    options:0
                                                                    metrics:metrics
                                                                      views:viewsDictionary];
Let’s check the string for the horizontal data. @”H:|-hSpacing-[redView]-hSpacing-|”
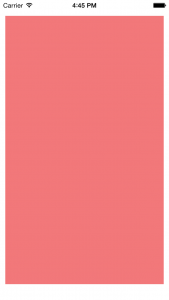
We simply define both margins to the left and to the right of redView in relation to its superview. Nothing more. You can check the result compiling and changing your device orientation.
EX6: Defining constraints through relations
Another really cool feature of Auto Layout is the ability to edit an attribute of a view in relation to an attribute from another view. With this kind of interaction between views you can achieve really complex behaviours.
The function that lets you easily create these relations in constraintWithItem:attribute:relatedBy:toItem:attribute:multiplier:constant: (from now on I’ll just call it The_function :P) of NSLayoutConstraints.
Thanks to The_function you can create constraints like this:
“redView width has to be the half of yellowView height plus 20 points”.
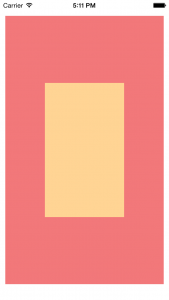
In example 6 redView behaves just as it does in the previous example, while yellowView has to be the half of the redView size and it has to be centred in redView. Here’s the result:
Step 1 and 2 setup redView as in example 5.
While in step 3 we build the size relations using The_function.
// SET THE WIDTH
[self.view addConstraint:[NSLayoutConstraint
      constraintWithItem:self.yellowView
               attribute:NSLayoutAttributeWidth
               relatedBy:NSLayoutRelationEqual
                  toItem:self.redView
               attribute:NSLayoutAttributeWidth
              multiplier:0.5
                constant:0.0]];
Ok this is quite a long function but it’s extremely easy to read.
First as for the previous examples, we attach the positioning constraints to the main view. This function just builds a constraint like:
yellowView.width = redView.width * 0.5 + 0.0;
It uses an equality relation (NSLayoutRelationEqual) to associate a value to the yellowView width (NSLayoutAttributeWidth) starting from the redView width multiplied by the multiplier (0.5) and adding a constant value (0.0).
The height constraint is built in a really similar way, it just needs different values (NSLayoutAttributeHeight) as attribute parameters:
[self.view addConstraint:[NSLayoutConstraint
      constraintWithItem:self.yellowView
               attribute:NSLayoutAttributeHeight
               relatedBy:NSLayoutRelationEqual
                  toItem:self.redView
               attribute:NSLayoutAttributeHeight
              multiplier:0.5
                constant:0.0]];
Now move to step 4, where we want to center the yellowView to the redView.
The needed formulas are:
yellowView.center.x = redView.center.x * 1.0 + 0.0;
yellowView.center.y = redView.center.y * 1.0 + 0.0;
and we produce them calling the previous functions using the attributes NSLayoutAttributeCenterX and NSLayoutAttributeCenterY and setting 1 as multiplier and 0 as constant.
    [self.view addConstraint:[NSLayoutConstraint
          constraintWithItem:self.yellowView
                   attribute:NSLayoutAttributeCenterX
                   relatedBy:NSLayoutRelationEqual
                      toItem:self.redView
                   attribute:NSLayoutAttributeCenterX
                  multiplier:1.0
                    constant:0.0]];

    [self.view addConstraint:[NSLayoutConstraint
          constraintWithItem:self.yellowView
                   attribute:NSLayoutAttributeCenterY
                   relatedBy:NSLayoutRelationEqual
                      toItem:self.redView
                   attribute:NSLayoutAttributeCenterY
                  multiplier:1.0
                    constant:0.0]];
and this is all for the last example to work as aspected.
We could also build constraints based on other relation types (NSLayoutRelationLessThanOrEqual and NSLayoutRelationGreaterThanOrEqual) and linking many other attributes (CMD + click on one of the attributes previously used in the functions).
While if we want to build constraints with no relation simply by specifying a constant value for a single view, we can pass nil as second item and NSLayoutAttributeNotAnAttribute as second attribute, then specify the constant we need.
Good night
Great! This is everything I wanted to cover in this short Auto Layout series, but since it is a really important topic, here are some other resources you should take a look at:
A great book by Erica Sudan:
iOS Auto Layout Demystified
A really complete tutorial from Objc.io:
Advanced Auto Layout Toolbox
A great category which helps you with Auto Layout coding:
UIView-AutoLayout
The official quick documentation about VFL:
Visual Format Language
Ciao!
Yari D'areglia
https://www.thinkandbuild.itCEO at Nexent.io by day, indie game developer by night. I also run the blog indiegames.wtf.
